
Hey everyone! I’m Daniel, and I started Reciqa because I truly believe that cooking should be a joy, not a chore. For me, it’s all about bringing people together and making those sweet memories, you know? I love finding those simple recipes that just *work*, and this mango float recipe? Oh boy, it’s an absolute winner. It’s one of those no-bake desserts that feels super fancy but is ridiculously easy to whip up. Imagine layers of crunchy biscuits, creamy, dreamy filling, and sweet, juicy mangoes all chilled to perfection. It’s the kind of dessert that makes everyone ask for the recipe, and trust me, you’ll be so happy to share it!
Gathering Your Ingredients for Mango Float Bliss
Alright, let’s talk about what you’ll need to make this incredible mango float. It’s really not complicated, but having the right stuff makes all the difference. My philosophy at Reciqa is always to start with good ingredients, and this no-bake dessert is no exception. Getting these ready is half the fun, and it sets you up for a truly amazing mango float.
Biscuit Base for Your Mango Float
You absolutely need a good biscuit for the base of your mango float. Grandma used to use Petit Beurre biscuits, and I’ve stuck with that because they’re just perfect – not too sweet, not too crumbly, and they hold up beautifully overnight in the fridge. You’ll want about 30 to 32 of them, but honestly, it depends on your dish. The key is to use a plain, slightly firm biscuit. Avoid anything too soft or cakey, like sponge cake, because it’ll just turn to mush. Graham crackers are a classic swap, and ladyfingers can work in a pinch too, but those Petit Beurre biscuits? Chef’s kiss! They give the best texture.
Creamy Layers for Your Mango Float
This is where the magic happens, folks! You need 500ml of double cream, or heavy cream if that’s what you call it. Make sure it’s nice and cold – that’s super important for whipping. Then, we’ve got 10g of icing sugar, just to give it a little sweetness, and 150ml of condensed milk. Oh, the condensed milk! That’s what gives it that signature rich, creamy, almost custardy vibe that just melts in your mouth. It balances out the tang of the mangoes perfectly. Don’t skimp on the quality here; it really does make a difference in the final flavor and texture of your mango float.
The Star of the Show: Mangoes for Your Mango Float
Now for the main event: the mangoes! You’ll need 200ml of mango pulp, which you can usually find in cans or pouches. This adds an intense mango flavor and a smooth texture to the cream. Then, you’ll need about 500g of fresh, ripe mango pieces. This is where you want to use the good stuff! Get the sweetest, juiciest mangoes you can find. Ataulfo or Carabao mangoes are fantastic for this if you can get them. You want them to be soft and fragrant. Dice them up into bite-sized pieces – not too big, not too small – so you get a burst of fresh mango in every single bite of your mango float.

Crafting Your Perfect Mango Float: Step-by-Step Instructions
Alright, get ready to assemble this masterpiece! This is where all those lovely ingredients come together. Don’t stress, it’s super straightforward, and the result is just *chef’s kiss*. We’re building layers of pure happiness here, and the best part is, no oven required!
Preparing the Creamy Filling for Your Mango Float
First things first, let’s get that creamy filling ready. Grab a nice big bowl – you want plenty of room to work. Pour in your 500ml of cold heavy cream. Seriously, make sure it’s cold; it whips up so much better that way. Sprinkle in the 10g of icing sugar. Now, take your electric mixer (or a whisk and some serious arm power!) and start whipping. You want it to get a little thicker, nice and frothy. Don’t go crazy just yet, we’re not looking for stiff peaks here. Once it’s frothy, pour in that luscious 150ml of condensed milk. Now, go ahead and whip it all together again. This time, keep going until the cream is nice and thick, holding soft peaks. You’ll know it’s ready when you lift the beater, and the cream forms a little peak that gently curls over. It should feel luxurious and smooth, not runny at all. This is the heart of our mango float!
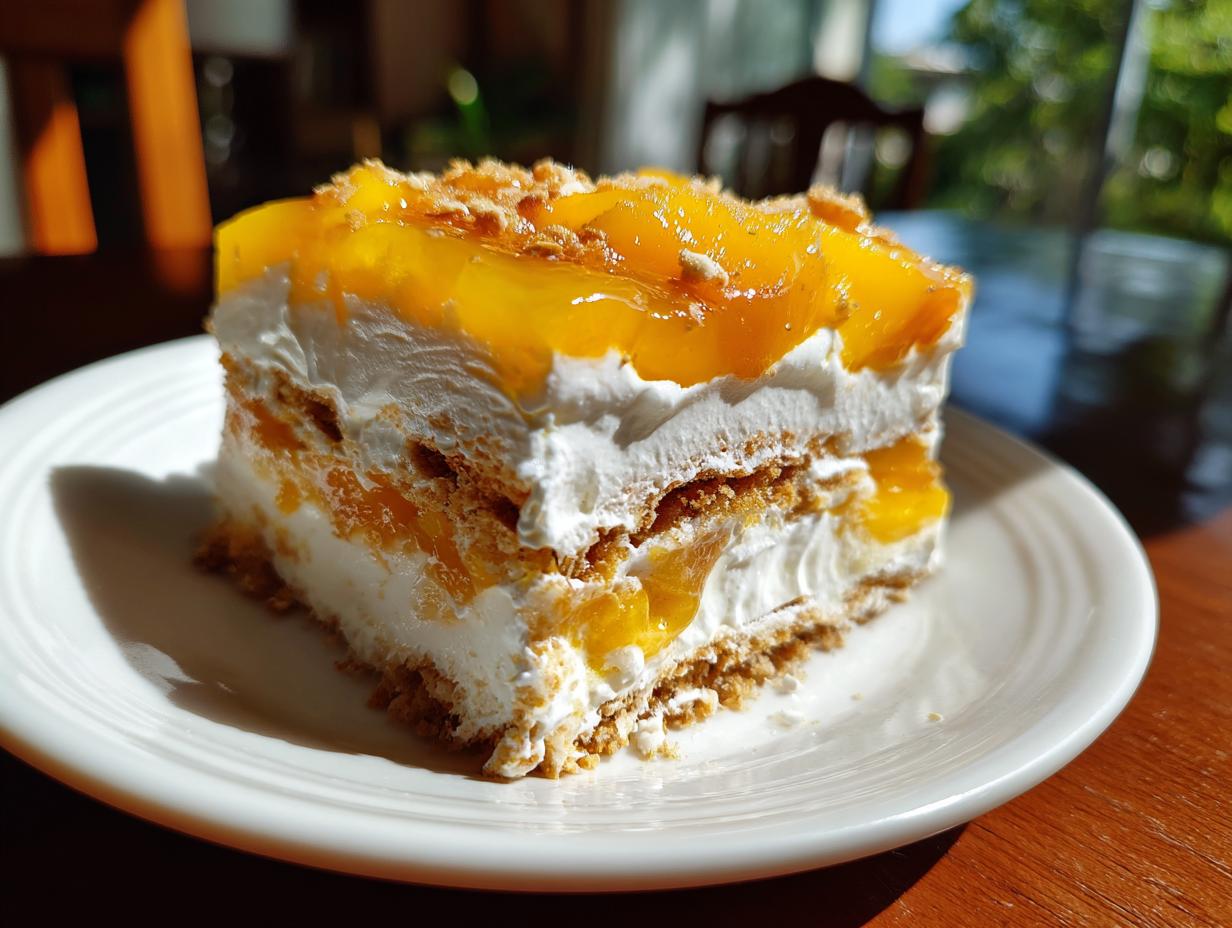
Assembling Your Delicious Mango Float
Okay, time to build! Grab an 8×8 inch dish. If you want to make life even easier later, you can line it with parchment paper, leaving some overhang. Start by laying down a single layer of your biscuits right at the bottom of the dish. Try to cover the whole base. Then, scoop about a third of your creamy filling over the biscuits. Spread it out as evenly as you can with a spatula. Next, drizzle about half of your mango pulp over the cream, and then scatter about half of your chopped fresh mango pieces. Now, carefully lay down another layer of biscuits on top of the mango and cream. Gently press them down just a little bit – you don’t want to crush them, but you want them to connect with the filling. Repeat this! Another layer of cream, spread it out. Drizzle the rest of the mango pulp and scatter the rest of the fresh mango pieces. Pop down one more layer of biscuits and give them another gentle press.
Chilling and Finishing Your Mango Float
We’re almost there! Now, take the remaining creamy filling and spread it evenly over the top layer of biscuits. Make sure it covers everything nicely, creating a smooth surface. Then, get creative with any leftover mango pulp you have – drizzle it all over the top, and scatter any remaining fresh mango chunks too. This is the pretty part! Once it’s all layered up and looking gorgeous, you need to cover it. Plastic wrap works great, or pop a lid on your dish. The most important part now is patience: it needs to chill overnight in the refrigerator. This isn’t just for cooling; it’s essential for the biscuits to soften up and absorb all those lovely flavors, and for the whole thing to set into that perfect, sliceable dessert. Trust me, the wait is SO worth it for the best mango float experience!

Why This Mango Float Recipe is a Must-Try
So, why should you absolutely make this mango float? Honestly, it’s a total winner for so many reasons:
- Super Easy to Make: Seriously, no baking required! It’s all about layering, and it’s perfect for when you want a showstopper dessert without the fuss of an oven.
- Incredibly Delicious: You get that perfect combo of creamy, sweet, and fruity. The biscuits soften up just right, and the mango flavor is just… wow. It’s pure bliss in every bite.
- Crowd-Pleaser Guaranteed: Whether it’s a family gathering, a potluck, or just a Tuesday night treat, this mango float always gets rave reviews. Everyone loves it!
- Perfect for Any Occasion: Birthdays, holidays, or just because you deserve something sweet – this dessert fits right in. It’s refreshing and satisfying all at once.
Trust me, once you try this mango float, it’ll become a go-to in your recipe collection! Check out some of our other delicious desserts.
Essential Tools for Making Your Mango Float
To whip up this dream of a mango float, you won’t need a whole kitchen arsenal, thankfully! Just a few key players will get the job done:
| Mixing Bowls | At least two – one for whipping cream and one for prepping mangoes or other ingredients. Bigger is usually better! |
| Electric Mixer | A hand mixer or a stand mixer makes whipping the cream so much easier and faster. You can use a whisk, but prepare for a workout! |
| Spatula | A flexible spatula is perfect for spreading the creamy layers evenly and scraping down those bowls. |
| 8×8 Inch Dish | This is the classic size for a mango float, but you can adjust slightly if needed. A glass or ceramic dish works great. |
| Measuring Cups and Spoons | For getting those cream, sugar, and condensed milk amounts just right. Accuracy helps achieve that perfect creamy texture. |
Frequently Asked Questions About Mango Float
Got questions about making the perfect mango float? I totally get it! It’s a simple recipe, but sometimes little things can trip you up. Let’s clear a few things up so your mango float turns out absolutely divine.
Can I use different biscuits for my mango float?
Absolutely! While Petit Beurre biscuits are my favorite for that classic texture, graham crackers are a fantastic substitute. You could also try ladyfingers or even digestive biscuits. Just steer clear of anything too soft or flavored, as they might get mushy or clash with the mango. You want a nice, neutral base that can soak up all that creamy goodness.
What kind of mangoes are best for this mango float?
This is key! For the best flavor, use sweet, ripe mangoes. Ataulfo or Carabao mangoes are often recommended because they’re super sweet and fragrant with minimal fiber. If you can’t find those, just pick the ripest, most fragrant mangoes you can find at the store. Avoid green or underripe mangoes, as they won’t have that lovely sweetness and might be a bit too tart.
How long does the mango float need to chill?
Overnight is really the magic number here. That chilling time is crucial for the biscuits to soften up and absorb the flavors from the cream and mangoes. It also allows the whole dessert to set properly, so you can get nice, clean slices. If you’re really pressed for time, at least 6-8 hours in the fridge will do, but overnight is truly best for that perfect mango float texture.
Can I add anything else to my mango float?
You could! Some people like to add a splash of vanilla extract to the cream mixture for extra flavor. A few finely chopped nuts on top could add a nice crunch, or maybe a sprinkle of toasted coconut. Just remember not to overpower the star of the show – the mango!
Storing and Reheating Your Mango Float
Leftover mango float? Lucky you! This dessert keeps beautifully in the fridge. The best way to store it is to make sure it’s tightly covered. I usually use plastic wrap pressed directly onto the surface to prevent any ice crystals from forming, or just pop the lid back on securely. It’s best enjoyed cold, so there’s really no need to reheat it. Just grab a slice straight from the fridge and enjoy!
| Storage Method | Cover tightly with plastic wrap or a lid. |
| Refrigeration Time | Up to 3-4 days. The texture is best within the first 2 days. |
| Serving Suggestion | Serve chilled directly from the refrigerator. |
Enjoying Your Homemade Mango Float
I really hope you loved making and tasting this incredible mango float as much as I do! Once you’ve whipped up your own batch, tell me all about it! Drop a comment below with your thoughts, give the recipe a star rating if you can, or even better, tag me in your photos on social media. Seeing your creations is the absolute best part of Reciqa for me!
Print
Amazing Mango Float: Easy No-Bake Dessert
- Total Time: 8 hours 20 minutes (including overnight chilling)
- Yield: 8 servings
- Diet: Vegetarian
Description
Mango Float is a delightful no-bake dessert featuring layers of biscuits, creamy whipped cream, and sweet mangoes.
Ingredients
- Biscuits/cookies/graham crackers (about 30-32 Petit Beurre biscuits used)
- 500ml double cream or heavy cream
- 10g icing sugar or powdered sugar
- 150ml condensed milk
- 200ml mango pulp
- 500g fresh chopped mango pieces
Instructions
- In a large bowl, combine cold heavy cream and icing sugar. Whip until slightly thicker and frothy.
- Add condensed milk to the bowl. Whip again until the cream is thick and holds soft peaks.
- Layer biscuits in an 8×8 inch dish.
- Spread a dollop of whipped cream over the biscuits.
- Drizzle mango pulp and add mango pieces over the cream layer.
- Add another layer of biscuits and press lightly.
- Spread another layer of whipped cream.
- Add another layer of mango pulp and pieces.
- Add a final layer of biscuits and press lightly.
- Spread the remaining whipped cream evenly on top.
- Add the rest of the mango pulp and mango chunks on top.
- Cover the dish and refrigerate overnight.
- Slice and serve the next day.
Notes
- Any plain, sweet biscuit or cookie can be used instead of graham crackers. Avoid overly soft biscuits. Ladyfingers are also an option.
- The exact number of biscuits needed depends on the dish size and biscuit type.
- Prep Time: 20 minutes
- Cook Time: 0 minutes
- Category: Dessert
- Method: No-Bake
- Cuisine: Filipino


